- Installing your nuc:
- Place frames 1 and 2 against one side of the new hive. Set frames 8-10 aside where you won't step on them.
- Open the nuc. Slowly loosen and remove the outermost frame, moving at bee walking speed. You may like a frame grabber for this. Place at position 3 in the new hive, firmly against frame 2, but without crushing bees.
- Loosen each subsequent frame in the nuc, move to new home, place firmly against the neighboring frame. Repeat until no frames are left.
- For undrawn frames 8-10, place firmly against frame 7, leaving a space between frame 10 and the sidewall. That will be important later.
- IMPORTANT NOTE: Disregard directions to press frames firmly together IF the frames are thick and will not leave a bee space between them. If many frames are thick, you can either use 9 frames total. You'll just need a second box a bit sooner.
- EXTREMELY IMPORTANT NOTE: Get the inner cover on ASAP, then shake and tap the bees in the nuc box onto the inner cover. Move nuc box at least 20 feet away right after. Otherwise bees may find the nuc and try to return to it; after all, that smells more like home!
- About 5 min or so after you open the nuc, many bees will be in the air, and many bees in the new hive will be fanning. This is not a defensive behavior. This is a summoning behavior, calling the flying bees to the entrance. The sooner you close the hive, so they can only use the entrance, the better. No pressure.
- First Visit after installing a nuc (2-5 days): Feeding!
- Keep the sugar syrup coming. 2 parts sugar to 1 part water. I mix in a 5 gallon bucket with a drill, using a paint stirrer attachemnt.
- You will have a box over the feeder container, and then the lid. The feeder container (quart jar, etc) will set on the inner cover. There will be bees on the jars (after a few weeks) - wear your veil when you refill.
- A Nuc can take a quart a day, if the weather is warm enough (highs in the 60s) for them to build comb easily.
- You can use quart jars, or 1 gallon feeder buckets, but those will NOT work when the temps are below 50 at night - bees get too cold if they try to suck up cold liquid. That's OK, it will warm up eventually, just don't expect progress in comb construction and push back dates here accordingly.
- You can use an in-hive feeder if temps will be cold and stay cold.
- You can refill 1 quart each day, or every other day. Or add 1 gal at a time, for 2 trips a week.
- Second Visit, but First Inspection! (7-12 days): Cycling an undrawn frame to the middle
- This is a good time for a mite treatment. A good option is an Apivar strip, see the mite page for more info about how/why treat this way.
- If the bees are flying, and there isn't much dew on the ground, and it's more than 2 hours until sunset, it's a good day to inspect.
- If you're not sure about moving frames around, check out my First Inspections page.
- You will want to check the queen is laying eggs, and you will want to check for comb construction progress.
- And you will want to cycle an outer frame to position 5!
- I recommend having a sheet of paper or notebook with each goal as one line, so you remember to do each. And you write down what you did. And ideally what you saw.
- Start at the frame with the most room between the side and the frame (called frame 1 here). It will be undrawn still. Remove and set aside. Push undrawn frames 2 and perhaps 3 aside; if no comb, few bees will be on them.
- The frames next to the drawn nuc frames are likely to have comb started. It may be nectar, or have eggs already. If it's shiny, it's nectar. If it looks like comb but empty cells, could be eggs (and the queen nearby).
- Do not go past frame 5. The other side of the hive will be a mirror image; no addtional info.
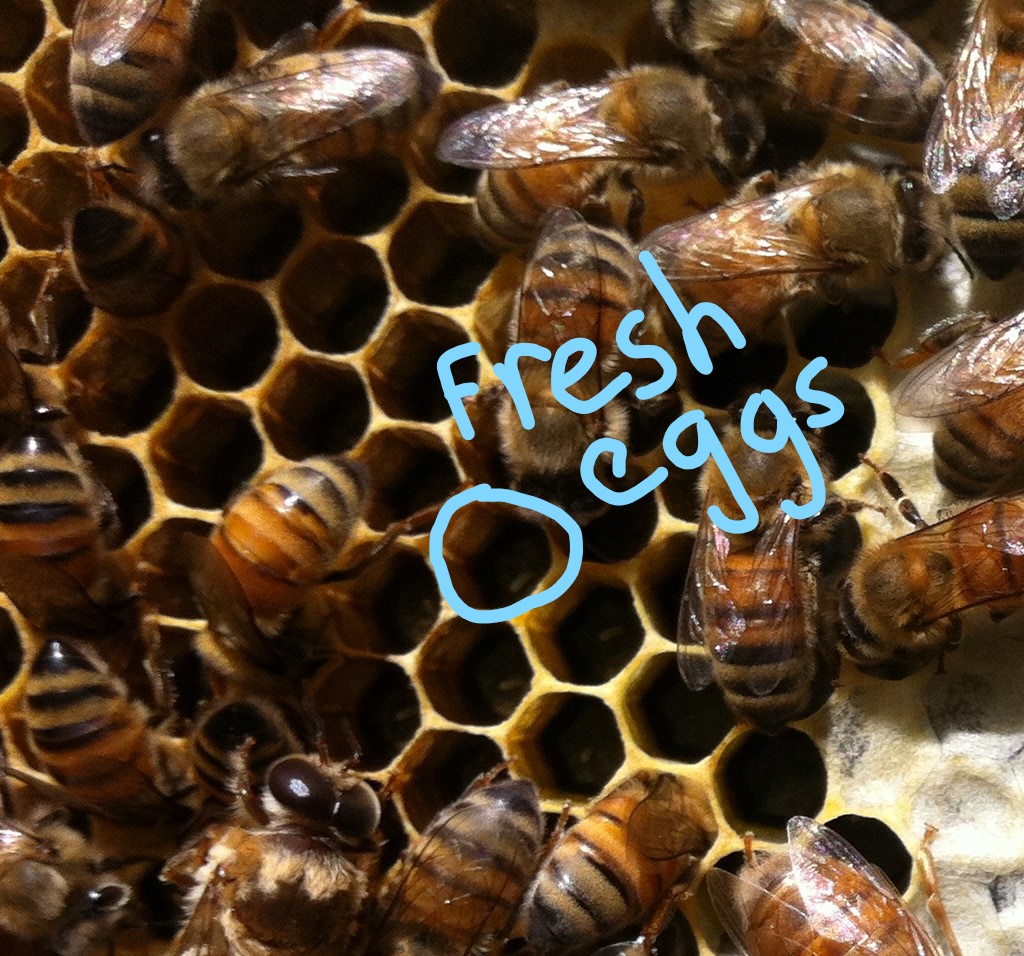
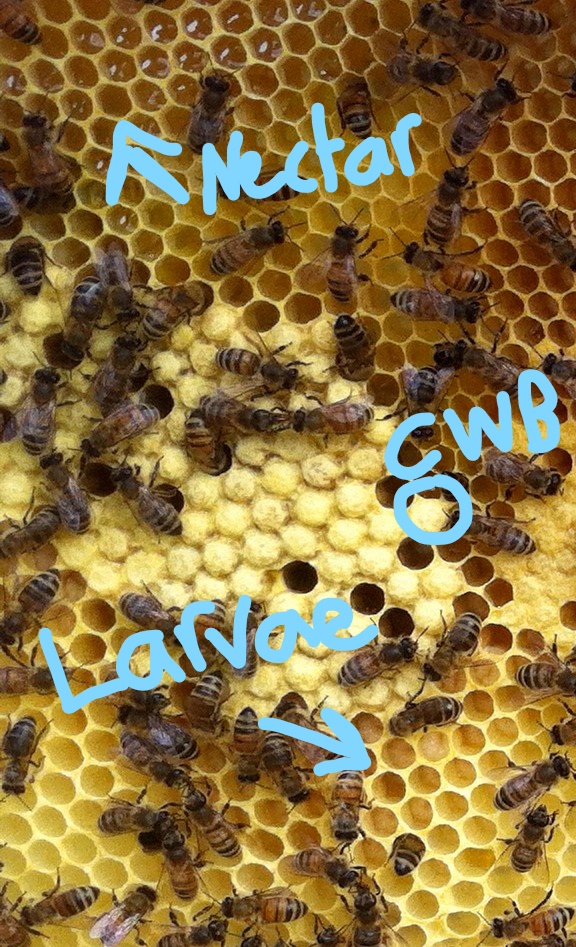
To identify what's on a frame:
1. Finding Eggs: Find a frame with drawn comb, but NO CLEAR SHINY LIQUID in the middle.
Stand with the frame held over the hive, but the sun or most light coming from
behind you. If there's eggs, you'll see 'em.
2. Finding Larvae: Look next to capped brood (CWB below), and look for milky liquid in the cells.
3. Finding capped brood: AKA CWB for capped worker brood. It is in the middle of the frame, with a solid not translucent capping, that looks like toffee.
4. Finding Nectar: It's clear and shiny, fills cells to the top, and is either at the top of the frame, or fills the whole frame.
Notice I didn't mention honey. It will be found where nectar was, later in the summer. Initially the bees are pretty focused on construction, rather than on savings.


In between inspections, you should be feeding, about a quart a day. I have not found the bees to ever turn down syrup, though they may slow their intake if there is a nectar flow. At this point, just take the pollen patty out, if it's still there. It goes bad at room temp eventually.
- Second Inspection (day 14 or so post install):
- But not your second visit! You're feeding diligently, right?
- Mission 1: Cycle another outer frame in to position 5.
- Mission 2: Note progress on comb construction. As in, plan on checking 4 frames, and write down which is undrawn, partially drawn out, or done.
- Mission 3: Find eggs or young larvae, to confirm the queen is OK.
- Keep feeding, throughout this period, until all frames are drawn, even if there is a nectar flow.
- Exciting Inspection...Add a second brood box! (day 21 or so):
- Seriously, keep feeding, throughout this period, until all frames are drawn. Trust me, it's a good investment of time, and not bad for the bees. They don't care where their carbs come from.
- Once there is only 1 undrawn frame left, which will be about day 21 or your 3rd inspection, time to add the second brood box. This might be another deep, or a medium if that is how you want to house the queen and her brood. These are not frames intended for honey harvest, but only for the use of the queen for brood, or for the hive for winter stores.
- You can just put the second brood box on, place inner cover above, then feeder system, then box over feeder system, then lid.
- Or you can take frames 4-5 from box below, place in top box in positions 4-5. The rest of the frames will be undrawn. In the box below, you will push the rest of the frames together, and have the new undrawn frames placed at the outside of the box. They will need to be cycled inwards eventually, but let them get good progress above first.