- Installing your Package: Be Ready before you install.
- First - watch a video. Note that Mr. Oliver does not wear a veil. He has mucho experience with bees and knows when the odds are low that he could get stung in the eye. You don't (yet). Wear the veil!!!
- Second - find your local bee club. You will find other new beekeepers and some old hands. If you only bought one hive, and things go wrong (which on average they do 10-15% of the time), you will need their help. Get connected before the bees arrive.
- Realize that the package bee seller is a middleperson. They may have their own hives, but that's not what you're getting. They have no control over the shipping conditions or timeline. They want to help but are limited in what they can do. It is worth asking what can go wrong with your bees in the first 3 weeks, and what they can help with.
- What You'll Need the Day Of:
- Liquid Feed System: Quart jars elevated with shims, or 1 gallon feeder buckets, or in-hive feeder
- Liquid feed: 2 parts sugar to 1 part water
- Feeder box: can be the next brood box. It is set on the inner cover. Only used if you chose something other than the in-hive feeder
- Apivar strips for mite treatment
- A spritzer/sprayer with warm 1 part sugar to 3 parts water - those bees will be thirsty and will benefit a lot from a few spritzes right away. And it is handy later. See video above.
- The day of installation, walk through the steps you will do.
- Open package by pulling feeder tin out. Get queen out. Place temporary lid on package, like a piece of cardboard. Move slow, use the mister once or twice on the bees, you'll be fine. This is the hardest step.
- Check to be sure the queen is alive. If she isn't, you will still do the rest of the steps today, but you will be sourcing a queen tomorrow. Take a pic, call the package bee seller. Note if you bought 2 packages, and one queen is dead - better to just merge the 2 packages. You can split later that summer no prob.
- Then place queen (candy plug in place, remove protective cork if needed) between frames 4 & 5. There's a wire for hanging the queen cage.
- Have frames 1-4 (4 has queen) and ONLY frames 9-10 in place.
- Then invert package and... wait for it... DUMP THEM! Sharply shake them into the hive. 3 sharp shakes, 2 sec apart, should do it.
- Gently and slowly push frames at position 9-10 into position 5-6. Insert the rest of the frames.
- Frame arrangement: worth being picky here. Frames 4-5 must have a gap, due to the queen cage. Have frames 1-4 firmly together and against the side wall. Then the queen cage and gap. Then frames 5-10 be firmly together, but with a gap between the side and frame 10. You'll see why later.
- Catch your breath, place the inner cover on, get the feeder setup in place, get the lid on, and remove the package to a location 20 feet or so away. It kind of smells like home...don't want the bees thinking that!
- About 5 min or so after shake the bees in, many bees will be in the air, and many bees in the new hive will be fanning. This is not a defensive behavior. This is a summoning behavior, calling the flying bees to the entrance. The sooner you close the hive, so they can only use the entrance, the better. No pressure.
- First Visits Back (day 3-10): More Feeding!
- Don't worry about retrieving the queen cage - yet. The less you mess with the bees, until the queen is laying, the better. Unless you left the cork in, so there is no access to the removeable candy, the bees will either let her out, or let her die. Not much you can do...
- ...except feed the bees to support her acceptance. Plan for 1 quart of 2 parts sugar: 1 part water every day.
- If there is flying weather, look for pollen coming in. That means the bees need to feed some brood - and that means the queen is busy.
- Your first inspection: 8-12 days post install.
- Your mission: confirm the queen is operational. See my First Inspections page for some inspection tips.
- You want to get to frame 4, remove the queen cage, confirm she's not still in there. Do not go directly to frame 4 and pull up. You will want to create at least 1/8" or more of space between the frames. Note that frame 10 should have a lot of space next to it and the side. If not, if frame 1 does, then use that frame as your entry point. Remove this frame, slowly and gently, and set aside. Then use the hive tool to move frames 5-9 as a unit so that you can reach the queen cage.
- If she is still in the cage and alive, just remove the candy then, and hold the open end down touching a frame, and... wait for her to saunter into the hive. She'll get there.
- Check for progress in drawing comb. Write down if there is comb on frames 4 and 5.
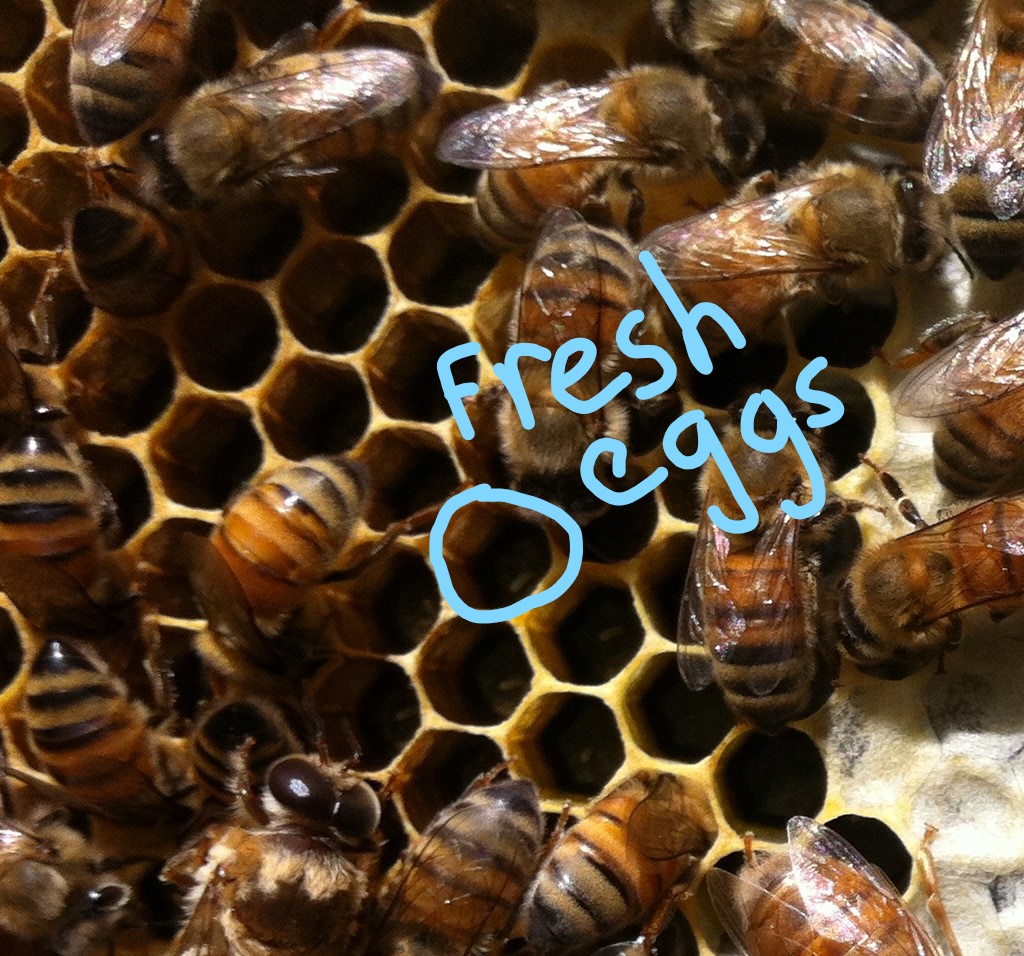
- If there is comb, check for eggs. Again see First Inspections page for some tips. Write down the date and that you saw eggs.
- If the queen is dead, or there is no comb, it may be there will never be eggs. The bees know when they have a bum queen. The best option, if you see almost no comb at this point: get a frame of eggs from somewhere and add it. Ideally from your second hive... Just bought one package? Find a friend with bees ASAP. You can probably get a frame with eggs, or maybe even one with a queen cell!
- Do not buy a replacement queen, unless you have a dead queen in hand. If your bees never had a queen, it's probably too late to introduce one. You will need to fix this another way. See above.
- If it's been cold, highs below 50, during this 10 day stretch, you will not see much comb production, but that will change quickly once the weather warms up.
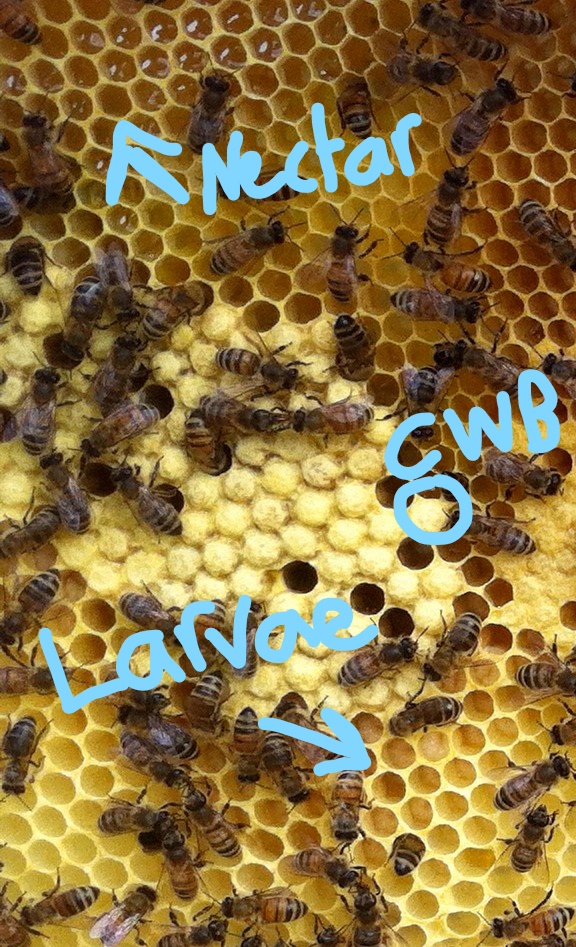
To identify what's on a frame:
1. Finding Eggs: Find a frame with drawn comb, but NO CLEAR SHINY LIQUID in the middle.
Stand with the frame held over the hive, but the sun or most light coming from
behind you. If there's eggs, you'll see 'em.
2. Finding Larvae: Look next to capped brood (CWB below), and look for milky liquid in the cells.
3. Finding capped brood: AKA CWB for capped worker brood. It is in the middle of the frame, with a solid not translucent capping, that looks like toffee.
4. Finding Nectar: It's clear and shiny, fills cells to the top, and is either at the top of the frame, or fills the whole frame.
Notice I didn't mention honey. It will be found where nectar was, later in the summer. Initially the bees are pretty focused on construction, rather than on savings.


- Second Inspection (day 14-16 post install): You'd better see new comb and brood.
- But you've been visiting already, right? To feed sugar syrup (2 sugar: 1 water), and watch the bees fly? Take notes on a calendar, or sheet of paper, about what days were fly days, what days you fed...
- Do this inspection 4-6 days after the last one - time is of the essence if the queen is a dud. Yes, opening the lid and removing frames is a stressor on the bees - but it is critical at this stage to see evidence the queen is OK, or to find evidence that you need to get one ASAP.
- If temps have been above 60 for more than 10 days, you should see eggs, young larvae, and maybe a patch of capped brood.
- The brood may only be on frames 4 and 5. Remember, do not go directly to those frames and pull them up.
- If there is no sign of eggs, and little comb, and it's been nice weather - 10-15% of package queens are too stressed by the process to function. The hive can be rescued with a frame of eggs and larvae - or a new queen. Unfortunately, odds are good you are just missing the eggs. Take pics of the frames with the most comb, zoom in on them, send the pics to the package bee seller - they will have spare queens.
- If you're out of luck from the package bee seller, and only have one hive... try your local bee club!
- Third Inspection (day 18-22 post install): Seeing comb and capped brood.
- About a week after your last inspection, time to check again. Review your "flight plan" ahead of time, have a notebook handy too.
- If you saw eggs and larvae at your prior visit, now you'll be seeing more drawn comb, still eggs and larvae (on new comb), and now capped brood.
- If you didn't see eggs and larvae at the last inspection, but it was chilly weather, the bees may be at the point described in the prior inspection. But if you don't see eggs and larvae, you need to find help.
- This point is officially too late for the bees to be able to accept a mated queen. Their bodies have changed to the "forager" mode, and they don't have the right anatomy anymore to feed baby bees. Adding a queen will just get her killed.
- A package of bees that had no queen can be saved at the 3 week point - only with a frame of eggs and young larvae. If you got 2 packages, you will be able to take a frame from the other hive and add to this one. If you found a beekeeping buddy at a local meeting, you might be able to get a frame of eggs/larvae from them. You don't have to worry about bees on the frame; they will be accepted readily by any hive. You don't want to transport bees on an open frame; those can be gently shaken and brushed off at their home apiary. Note that eggs and larvae are killed by direct sunlight, and are vulnerable to dessication. A wet dishtowel is good protection. See my queen cells page for more about handling this situation to save the hive.
- Be sure to note what you're seeing with each inspection. New comb? Full, part, which frame? Nectar there, or eggs/larvae? Just take out 4 frames, but really know what you saw on those frames. Take a pic of each side, if it is more than undrawn foundation.
- You only need to look at frames 1-4 to get accurate info about whether the hive is making progress; the other side of the hive is a mirror image.