What do I need to buy to get a beehive?
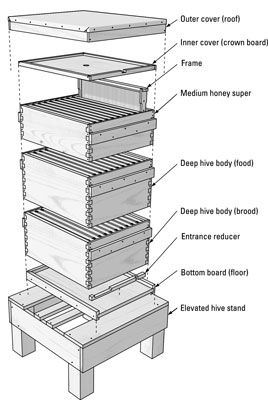
First, the anatomy of a hive. This pic is from The Parts of a Bee hive, from the Beekeeping for Dummies website.

- Let's take it from the top down.
- LID AND INNER COVER: The hive needs both parts. It really doesn't matter which kind or style of these that you get. The lid is also called the "telescoping lid". The inner cover is necessary because the bees will sometimes glue frames to whatever is above them - and while it is difficult to pry the inner cover free from the frames, it is possible.
- HONEY SUPER: In this diagram, the top box is a bit shallower. It is intended for HONEY ONLY. So it is called a honey super. These can be about 6 3/4" in height (AKA a medium), or about 5 1/2" in height (a shallow). A hive will usually reach full size their first year, and require 2 honey supers minimum in addition to the brood nest boxes. Get 3 supers.
- BROOD NEST The 2 boxes towards the bottom of the stack are intended to be for the queen and brood (baby bees) ONLY, and also for the bees' Winter Quarters. Note that during fall, the top box (of the brood nest) is intended to be filled with honey. A 10 frame deep may weigh 60 lbs.
- BOTTOM BOARD: The bottom board serves 2 functions: first, it extends the space below the frames for the bees, so they have somewhere to hang out when it's hot but they can't forage. This space can be deeper than 3/8", since the bees rarely draw out extra comb here. Secondly....importantly... this is the entrance! The 3 sided construction of this base provides the entrance.
- HIVE STAND: This needs to be stable, between 10-18" in height, and set up with grass growth in mind. As in, the grass will grow in front of the stand, and the bees need the hive entrance to never get blocked by grass. My solution is to not have a stand shorter than 12" in height, AND to put something down like a paver stone, groundcloth & mulch, old feedbags, cardboard & mulch...you get the idea.
Be aware that this all needs ready before the bees arrive.
That means the frames need to be assembled, and so do the boxes. And the boxes need 2 coats of paint. The edges of the lid, inner cover, and hive stand that are exposed to the elements should be painted too. No pressure!
You buy the lid, inner cover and base assembled. You can buy plastic frames and boxes assembled, and boxes painted, if you like.
If you choose to build, boxes and frames must be "square" (90 degree angles).
Here's a site that has
great advice on building a hive body. If you don't know what a countersink drill bit
is, then find out and buy one. If you don't have a drill, then find someone with a
hand-held battery-powered drill and have them help you pick one out.
And here's a video.
In that video, there's lots of nailing. I don't nail. I glue and drill. See first website for that approach.
Here's a website that goes through the steps
for a single frame. They nail A LOT, and I actually don't nail at all... so up to you how to proceed.
I use a frame jig
- if you do carpentry, or a buddy or relative does, here is a cut list.
Here is a video on how to use it.
The standard is using two 10 frame deep hives as the brood nest... but there are options that are just fine for the bees, and possibly better for you!
The double deep brood system - if you recall, this is where the queen lives year-round, and this will become the only boxes on the hive in the winter - makes for heavy boxes. You're not usually lifting the bottom box, but you are often lifting the top box. This is necessary sometimes to understand how the hive is doing.
- Variations on the double deep brood chamber system:
- 2 deeps, but 8 frames in width. It's lighter. Has the same pros/cons of a double brood chamber.
- 3 eight-frame mediums. This is your lightest box, but be aware the broodnest has 24 frames to think about.
- 1 ten-frame deep and 1 medium. When the bees put honey in the medium, it's 45 lbs full instead of 60.
- Mann Lake has good quality stuff, but try to find someone local. It's worth a 1 to 2 hr drive to try bee gear on, and see for yourself what the assembled stuff looks like. Don't buy beekeeping woodenware at a store that has "-mart" in the name, or sounds like a large river basin in South America, or has the words "tractor" or "supply". Too cheaply made.
For information on the long hive, or on the single extra-tall brood chamber as alternatives to the multiple boxes for hives, check here. Sadly those options are not readily available from most bee supply outfits.
Plan on finishing 2 honey supers for your first year
You'll be better off if you finish those before the bees arrive, even if you don't use them this year.
Plan on buying a spare base, lid and deep with frames. It will save you a lot of stress, and you may need the extra box for feeding anyways.