Managing a Top Bar hive - Kind of just a sideways Langstroth?
Bees don't care what you put them in...
Managing any beehive will have common elements independent of the hive style. Ultimately, a beehive is managed by inspecting the frames and using the
information revealed to do...something. Hopefully the right thing.
Here is a great video on hive inspections.
Hives are managed differently depending on the season, and whether beekeepers want honey or more bees from the hive.
Here I say more about inspection approaches and strategies, since
managing bees is pretty universal across hive styles.
Here is more about the management through Summer, with links to fall and winter. Understanding the
risks each season has for the bees helps guide what to do and when to do it for bee management.
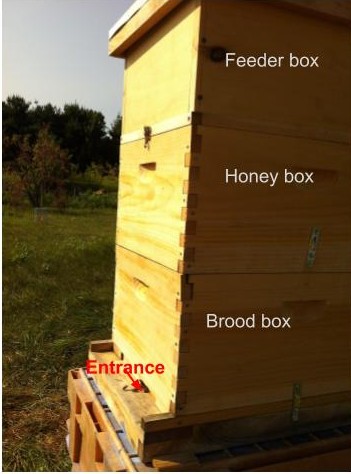
When we look at a Langstroth tower-style hive, we typically see a stack of boxes, with an entrance at the bottom,
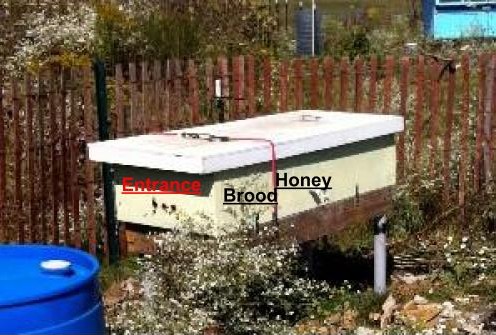
brood frames just above that, and honey stored above that. A top bar hive is like a langstroth turned on its side.
The brood will be closest to the entrance, and the honey will be furthest. This general map helps relate the two hives styles, tower/vertical and horizontal.


Starting your Top Bar Hive
First step: get the hive AND the gear that you'll need to manage it.
Take some time to think about the design, whether you should just purchase something premade, or possibly find a local carpenter to make the hive. There are detailed plans available (see here for free top bar building plans, or go to my top bar build page).
Take some time to decide on your means of feeding liquid syrup, your veil, the smoker, and
the mite treatment you plan to use. Yes,
buy that at the same time you get your hive. Best
options are Oxalic Acid Dribble or
Apivar strips.
- Some pieces of gear you will want to get for your kit, unique to top bar hives:
- A tool to cut side-attachments, that is kind of shaped like a flattened golf club;
- Items to attach fallen comb back to the bar. Choices include large rubber bands, string, chicken wire, zip ties... just have it on hand!!! Mostly you won't need it, until you do;
- A container with a lid that will fit a large piece of comb, should the fallen comb contain honey and you want to harvest it;
- A knife for cutting comb, or cutting chunks with queen cells;
- A thin rigid bar about the length of the hive, that is taller than the bars. It needs to be pretty strong. A piece of wood 1/8" thick is good, or a piece of corrogated plastic that is cut into the shape of a tall bar.
Next step: getting bees (that are mite free).
Bees are available as a 3 lb package from various sources. Or, if you're lucky, a beekeeping buddy might pass along a swarm.
You'll be managing a lot like someone with a new package would be doing... see the
package bees 1st inspections page.
As a northern beekeeper, I can testify that the biggest obstacle to Top Bar hive success is successful
mite treatment strategy.
Well, start on the right foot: treat for mites when you acquire your bees, with
Apivar strips. I've also used oxalic acid with a
vaporizer, but I needed to make a slot ahead of time under the front/entrance
part of the hive to get the wand into the box. You will not be getting mite free bees, and in fact,
they may be mite laden. Happily, I have found that treating when the bees are broodless (so, when first acquired, and in the
fall and winter) can be sufficient for successful mite management.
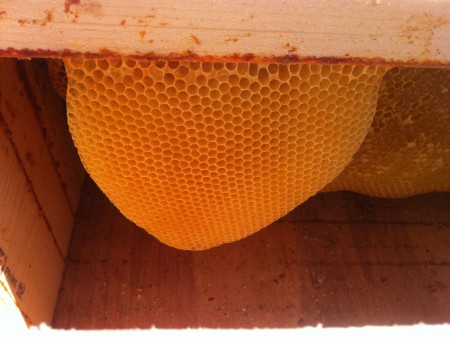
Comb means life for the hive.
The bees use comb as cradles for the baby bees, and the pantry for the colony. Without comb to store excess pollen and nectar, the bees are living hand-to-mouth and will not thrive. In fact, they will lose population every time the foragers make a foray. You can expect a hive to be able to take 1 quart a day, if the average temps are warmer than 50 degrees.
Bees make comb when:
1. They have enough nectar (or sugar syrup) coming in to engorge bees;
2. They have enough bees of the right age;
3. They have high enough temps to draw out the wax flakes into comb.
Without those conditions, the bees will not draw comb; so you may have to feed and wait for better weather, or for
the bees to get full. But Don't Stop feeding until the bees have drawn out all the comb they need
for their winter pantry - even if natural nectar starts coming into the hive.

How to feed: I use 2 inverted mason jars as feeders (on a short stand, twigs or wood blocks) under bars 7-10. I make the holes with a small nail, about an inch long nail or smaller is good. I put about 15 or so holes in the lid, and I do not find that when it sits about the bees, that it leaks. Phew! I use 2 parts sugar to 1 part water, see here for the reasons why. I put in 2 quart jars, and check (and eventually fill) about every other day. And open feeding is a beekeeping sin, IMHO. So don't do it. Your neighbors will thank you.
For a top bar that is starting from a package but already has drawn comb from a prior season, feeding is still important until the bees have at least 2 bars of their own stores stocked up, and 4-6 frames of capped brood. Then they will have the workforce to gather their own feed.
The bees will benefit greatly from pollen, in the form of a pollen patty (not a winter patty). I have not yet fed that in a top bar hive, but if I did... I would suspend the patty from a bar with string, so it was next to the new comb or the cluster. Then I would keep moving the "pollen bar" out as the bees drew comb. Once the bees can regularly forage for pollen, I don't feed pollen. Again, open feeding is a possibility for pollen dust, but open feeding generates a feeding frenzy, which is potentially bad for the neighborhood, and for the bees if bees that will rob are triggered to start looking for "victims".
General hive inspection process:
- Start at the end of the hive farthest from entrance. This will be the side with honey.
- Using the hive tool, slowly pry one side of the last top bar away from the one ahead, feeling for resistance. It may be necessary to remove comb attached at the side. Smoke the area if there are bees, then insert the comb slicing tool of choice at the bottom of the attachment, then PULL UP (never down).
- Pry apart the other side of the bar, then once you see there are no attachments, move the whole bar along the hive about 3 inches away from its neighbor. It may be necessary to cut some comb-to-comb attachments before you can move the bars apart.
- Following the same "one side at a time" process, move the next bar out, then slowly flush against the next bar.
- Or when there are lots of bees overflowing off the combs onto the bars, push bars together to about a bee space apart. Then use the thin bar/plastic piece (that is 1/8" in width) as a prod to force the bees down, push the bar together, then pull the thin prod up.
- Move one bar at a time when you are going into undiscovered territory into the hive; when closing up you can move multiple bars back in place.
- Check for comb building "errors" every 7 days, and go in ready to fix or destroy wonky comb.
- Never tip a bar sideways to see the other side; instead, either place in an empty box, or learn to rotate it upside down without ever having the comb horizontal - it gets smooth pretty quickly.
- Mark the top of the bars with their comb type: Worker cells (Wkr), Eggs (e)/Larvae (lv)/Capped Brood (CWB), Drone cells (Dr), Pollen (P), Honey(H), Queen Cell (QC). Sometimes comb of 1 kind will change identity, but that's helpful information.